Spring Boot Kafka Tutorial
Spring Boot Kafka Tutorial
Introduction
In this tutorial, we will be integrating a Spring Boot Application with Kafka Producer using Kafka Producer API. Through RESTful API in Spring Boot we will send messages to a Kafka topic through a Kafka Producer. We will also be using a Java based Kafka Consumer using Kafka Consumer API to consume and print the messages sent from the Spring Boot application.So there are 2 Applications required to get the end to end functionality:
- Spring Boot Application with Kafka Producer API
- Java Kafka Consumer Application with Kafka Consumer API
Kafka
Kafka is a distributed streaming platform. It can be used for communication between applications or micro services. Kafka is ideally used in big data applications or in applications that consume or process huge number of messages.
Some use cases where Kafka can be used:
- Messaging
- Website activity tracking
- Metrics
- Log aggregation
- Stream processing
- Event sourcing
- Commit log
Few Advantages of Kafka:
- Horizontally scalable
- Fault-tolerant
- Very fast
- Tried, tested and used by many organizations in production.
A few very important concepts are to be known when using Kafka.
More details about Kafka can be read from their website.
- Kafka is run as a cluster on one or more servers.
- The Kafka cluster stores streams of records in categories called topics.
- Each record consists of a key, a value, and a timestamp.
Topic
A topic is a category or feed name to which records are published. Topics in Kafka are always multi-subscriber; that is, a topic can have zero, one, or many consumers that subscribe to the data written to it. For each topic, the Kafka cluster maintains a partitioned log.
Distribution
The partitions of the log are distributed over the servers in the Kafka cluster with each server handling data and requests for a share of the partitions. Each partition is replicated across a configurable number of servers for fault tolerance.
Each partition has one server which acts as the "leader" and zero or more servers which act as "followers". The leader handles all read and write requests for the partition while the followers passively replicate the leader. If the leader fails, one of the followers will automatically become the new leader. Each server acts as a leader for some of its partitions and a follower for others so load is well balanced within the cluster.
Producers
Producers publish data to the topics of their choice. The producer is responsible for choosing which record to assign to which partition within the topic. This can be done in a round-robin fashion simply to balance load or it can be done according to some semantic partition function.
Consumers
Consumers label themselves with a consumer group name, and each record published to a topic is delivered to one consumer instance within each subscribing consumer group. Consumer instances can be in separate processes or on separate machines.
If all the consumer instances have the same consumer group, then the records will effectively be load balanced over the consumer instances.
If all the consumer instances have different consumer groups, then each record will be broadcast to all the consumer processes.
In this post, I will be using 2 Kafka core APIs:
- The Producer API that allows an application to publish a stream of records to one or more Kafka topics.
- The Consumer API that allows an application to subscribe to one or more topics and process the stream of records produced to them.
- Kafka
- Java
- Maven
- IDE of your choice
Kafka should be setup and running in your machine. To setup, run and test if the Kafka setup is working fine, please refer to my post on: Kafka Setup.
I am assuming that you have a Basic Knowledge of Spring Boot and have a Basic Spring Boot Application running in your machine. If not, please check my blog on Basic Spring Boot Application by going to the link: Spring Boot Tutorial
Application 1: Spring Boot Application
Once you have Kafka up and running and a Basic Spring Boot Application running in your machine, here are the additional steps required to integrate it with Kafka Producer.Step 1: Kafka Maven Dependency to be added in pom.xml.
Here is the dependency:
    <dependency>
            <groupId>org.apache.kafka</groupId>
            <artifactId>kafka-clients</artifactId>
            <version>0.11.0.0</version>
    </dependency>
Here is the full pom.xml:
<?xml version="1.0" encoding="UTF-8"?>
<project xmlns="http://maven.apache.org/POM/4.0.0" xmlns:xsi="http://www.w3.org/2001/XMLSchema-instance"
         xsi:schemaLocation="http://maven.apache.org/POM/4.0.0 http://maven.apache.org/xsd/maven-4.0.0.xsd">
    <modelVersion>4.0.0</modelVersion>
    <groupId>com.aj.springbootkafkaproducer</groupId>
    <artifactId>SpringBootKafkaProducer</artifactId>
    <version>1.0.0</version>

    <parent>
        <groupId>org.springframework.boot</groupId>
        <artifactId>spring-boot-starter-parent</artifactId>
        <version>1.5.4.RELEASE</version>
    </parent>

    <properties>
        <jdk.version>1.8</jdk.version>
        <java.version>1.8</java.version>
        <packaging>jar</packaging>
    </properties>

    <dependencies>

        <dependency>
            <groupId>org.springframework.boot</groupId>
            <artifactId>spring-boot-starter-web</artifactId>
        </dependency>

        <dependency>
            <groupId>org.apache.kafka</groupId>
            <artifactId>kafka-clients</artifactId>
            <version>0.11.0.0</version>
        </dependency>

    </dependencies>

    <build>
        <plugins>
            <plugin>
                <artifactId>maven-compiler-plugin</artifactId>
                <version>3.0</version>
                <configuration>
                    <source>1.8</source>
                    <target>1.8</target>
                </configuration>
            </plugin>
            <plugin>
                <groupId>org.springframework.boot</groupId>
                <artifactId>spring-boot-maven-plugin</artifactId>
            </plugin>
        </plugins>
    </build>
</project>
Step 2: Add Kafka Producer API
Here is the Java Service Class that has the Kafka Producer API. Using this we can send messages to Kafka Topic.
package com.aj.springbootkafkaproducer.service.impl;

import com.aj.springbootkafkaproducer.service.KafkaProducerService;
import org.apache.kafka.clients.producer.KafkaProducer;
import org.apache.kafka.clients.producer.Producer;
import org.apache.kafka.clients.producer.ProducerRecord;
import org.slf4j.Logger;
import org.slf4j.LoggerFactory;
import org.springframework.stereotype.Service;

import java.util.Properties;

@Service
public class KafkaProducerServiceImpl implements KafkaProducerService {

    private static final Logger logger = LoggerFactory.getLogger(KafkaProducerServiceImpl.class);

    public String sendMessageToTopic(String topicName, String message) {
        logger.info("Entering KafkaProducerServiceImpl.sendMessageToTopic Method");
        String status;
        try {
            final Producer<String, String> producer;
            final Properties props = new Properties();
            props.put("bootstrap.servers", "localhost:9092");
            props.put("acks", "all");
            props.put("retries", 0);
            props.put("batch.size", 16384);
            props.put("linger.ms", 1);
            props.put("buffer.memory", 33554432);
            props.put("key.serializer", "org.apache.kafka.common.serialization.StringSerializer");
            props.put("value.serializer", "org.apache.kafka.common.serialization.StringSerializer");
            producer = new KafkaProducer<>(props);
            producer.send(new ProducerRecord<>(topicName, message));
            producer.close();
            status = "success";
            logger.info("status is: {}", status);
            logger.info("Leaving KafkaProducerServiceImpl.sendMessageToTopic Method");
        } catch (Exception e) {
            logger.error("Exception: Error sending data to topic ", topicName,
                    e.getMessage());
            status = "error";
            logger.error("status is: {}", status);
            return status;
        }
        return status;
    }
}
Step 3: Spring Boot API to send messages to Kafka Topic
I am using KafkaProducerRequest as @RequestBody for the Spring Boot Kafka API. This is a simple POJO with 2 fields: topic and message
Using topic, the Kafka Topic Name can be specified.
Using message, a message can be sent to the Kafka Topic.
Here is KafkaProducerRequest.java:
Here is KafkaProducerController.java:
Using topic, the Kafka Topic Name can be specified.
Using message, a message can be sent to the Kafka Topic.
Here is KafkaProducerRequest.java:
package com.aj.springbootkafkaproducer.domain;

public class KafkaProducerRequest {

    private String topic;
    private String message;

    public String getTopic() {
        return topic;
    }

    public void setTopic(String topic) {
        this.topic = topic;
    }

    public String getMessage() {
        return message;
    }

    public void setMessage(String message) {
        this.message = message;
    }

    @Override
    public String toString() {
        return "KafkaProducerRequest{" +
                "topic='" + topic + '\'' +
                ", message='" + message + '\'' +
                '}';
    }
}
Here is KafkaProducerController.java:
package com.aj.springbootkafkaproducer.controller;

import com.aj.springbootkafkaproducer.domain.KafkaProducerRequest;
import com.aj.springbootkafkaproducer.service.KafkaProducerService;
import org.slf4j.Logger;
import org.slf4j.LoggerFactory;
import org.springframework.beans.factory.annotation.Autowired;
import org.springframework.http.HttpStatus;
import org.springframework.http.MediaType;
import org.springframework.http.ResponseEntity;
import org.springframework.web.bind.annotation.RequestBody;
import org.springframework.web.bind.annotation.RequestMapping;
import org.springframework.web.bind.annotation.RequestMethod;
import org.springframework.web.bind.annotation.RestController;

import java.util.HashMap;
import java.util.Map;

@RestController
@RequestMapping("/")
public class KafkaProducerController {

    private static final Logger logger = LoggerFactory.getLogger(KafkaProducerController.class);

    @Autowired
    private KafkaProducerService kafkaProducerService;

    @RequestMapping(value = "kafka", method = RequestMethod.POST,
            consumes = MediaType.APPLICATION_JSON_VALUE,produces = MediaType.APPLICATION_JSON_VALUE)
    public ResponseEntity<Map<String, String>> sendMessageToTopic(@RequestBody KafkaProducerRequest kafkaProducerRequest)  {
        logger.info("Request received is: " + kafkaProducerRequest );
        Map<String, String> response = new HashMap<>();
        String status = kafkaProducerService.sendMessageToTopic(kafkaProducerRequest.getTopic(),kafkaProducerRequest.getMessage());
        if("success".equalsIgnoreCase(status)) {
            response.put("Status is: " + status, "Message has been sent to Topic: " + kafkaProducerRequest.getTopic());
        }
        else{
            response.put("Status is: " + status, "Error in sending Message to Topic: " + kafkaProducerRequest.getTopic());
        }
        return new ResponseEntity<>(response, HttpStatus.OK);
    }
}
Application 2: Java Kafka Consumer Application
This is a simple Java Application with one class having a main method and logback integration so that we can print messages that have been received from the Kafka Topic. Here are the steps to get this application up and running.
Step 1: Dependencies in pom.xml
We add the following dependencies in pom.xml:
- slf4j
- logback
- Kafka
Here is the full pom.xml:
<?xml version="1.0" encoding="UTF-8"?>
<project xmlns="http://maven.apache.org/POM/4.0.0" xmlns:xsi="http://www.w3.org/2001/XMLSchema-instance" xsi:schemaLocation="http://maven.apache.org/POM/4.0.0 http://maven.apache.org/xsd/maven-4.0.0.xsd">
    <modelVersion>4.0.0</modelVersion>
    <groupId>com.aj.kafkaconsumer</groupId>
    <artifactId>KafkaConsumer</artifactId>
    <version>1.0.0</version>


    <properties>
        <jdk.version>1.8</jdk.version>
        <logback.version>1.1.3</logback.version>
        <jcl.slf4j.version>1.7.12</jcl.slf4j.version>
        <packaging>jar</packaging>
    </properties>

    <dependencies>
        <dependency>
            <groupId>org.slf4j</groupId>
            <artifactId>jcl-over-slf4j</artifactId>
            <version>${jcl.slf4j.version}</version>
        </dependency>

        <dependency>
            <groupId>ch.qos.logback</groupId>
            <artifactId>logback-classic</artifactId>
            <version>${logback.version}</version>
        </dependency>

        <dependency>
            <groupId>org.apache.kafka</groupId>
            <artifactId>kafka-clients</artifactId>
            <version>0.11.0.0</version>
        </dependency>

    </dependencies>

    <build>
        <plugins>
            <plugin>
                <artifactId>maven-compiler-plugin</artifactId>
                <version>3.0</version>
                <configuration>
                    <source>1.8</source>
                    <target>1.8</target>
                </configuration>
            </plugin>
            <plugin>
                <groupId>org.apache.maven.plugins</groupId>
                <artifactId>maven-jar-plugin</artifactId>
                <version>2.4</version>
            </plugin>
            <plugin>
                <groupId>org.apache.maven.plugins</groupId>
                <artifactId>maven-shade-plugin</artifactId>
                <version>2.3</version>
                <configuration>
                    <createDependencyReducedPom>true</createDependencyReducedPom>
                    <filters>
                        <filter>
                            <artifact>*:*</artifact>
                            <excludes>
                                <exclude>META-INF/*.SF</exclude>
                                <exclude>META-INF/*.DSA</exclude>
                                <exclude>META-INF/*.RSA</exclude>
                            </excludes>
                        </filter>
                    </filters>
                </configuration>
                <executions>
                    <execution>
                        <phase>package</phase>
                        <goals>
                            <goal>shade</goal>
                        </goals>
                        <configuration>
                            <transformers>
                                <transformer implementation="org.apache.maven.plugins.shade.resource.ServicesResourceTransformer" />
                                <transformer implementation="org.apache.maven.plugins.shade.resource.ManifestResourceTransformer">
                                    <mainClass>com.aj.kafkaconsumer.BasicKafkaConsumer</mainClass>
                                </transformer>
                            </transformers>
                        </configuration>
                    </execution>
                </executions>
            </plugin>
        </plugins>
    </build>
</project>
Step 2: Add logback configuration in logback.xml
Basic file based and console based logging configuration is added in logback.xml.
Please Note: Please change the log file location, mentioned in the logback.xml, as per your requirements.
In this file, I have used the log file location as: D:/projects/Logs/kafkaconsumer.log
Here is the logback.xml:
Please Note: Please change the log file location, mentioned in the logback.xml, as per your requirements.
In this file, I have used the log file location as: D:/projects/Logs/kafkaconsumer.log
Here is the logback.xml:
<?xml version="1.0" encoding="UTF-8"?>
<configuration scan="true">

    <appender name="consoleAppender" class="ch.qos.logback.core.ConsoleAppender">
        <encoder>
            <charset>UTF-8</charset>
            <Pattern>%d %-4relative [%thread] %-5level %logger{35} - %msg%n</Pattern>
        </encoder>
    </appender>

    <appender name="FILE" class="ch.qos.logback.core.rolling.RollingFileAppender">
        <file>D:/projects/Logs/kafkaconsumer.log</file>
        <rollingPolicy class="ch.qos.logback.core.rolling.TimeBasedRollingPolicy">
            <!-- daily rollover. Make sure the path matches the one in the file element or else
             the rollover logs are placed in the working directory. -->
            <fileNamePattern>D:/projects/Logs/kafkaconsumer.%d.%i.log.gz</fileNamePattern>
            <!-- keep 30 days' worth of history -->
            <maxHistory>30</maxHistory>
        </rollingPolicy>

        <encoder>
            <charset>UTF-8</charset>
            <pattern>%d %-4relative [%thread] %-5level %logger{35} - %msg%n</pattern>
        </encoder>
    </appender>

    <logger name="com.aj.kafkaconsumer" level="info"
            additivity="false">
        <appender-ref ref="consoleAppender" />
        <appender-ref ref="FILE" />
    </logger>

    <root level="error">
        <appender-ref ref="consoleAppender" />
        <appender-ref ref="FILE"/>
    </root>
</configuration>
Step 3: Add Java class with main method and Kafka Consumer API
In this class, if you note I am taking in the Kafka Topic Name, to consume messages from, as a program argument. Then I am using it in the line with code for consumer.subscribe
Here is BasicKafkaConsumer.java:
Here is BasicKafkaConsumer.java:
package com.aj.kafkaconsumer;

import org.apache.kafka.clients.consumer.ConsumerRecord;
import org.apache.kafka.clients.consumer.ConsumerRecords;
import org.apache.kafka.clients.consumer.KafkaConsumer;
import org.slf4j.Logger;
import org.slf4j.LoggerFactory;

import java.util.Arrays;
import java.util.Properties;


public class BasicKafkaConsumer {

    private static final Logger logger = LoggerFactory.getLogger(BasicKafkaConsumer.class);

    public static void main(String[] args)  {
        String topic = args[0];
        Properties props = new Properties();
        props.put("bootstrap.servers", "localhost:9092");
        props.put("group.id", "group1");
        props.put("enable.auto.commit", "true");
        props.put("auto.commit.interval.ms", "1000");
        props.put("session.timeout.ms", "30000");
        props.put("key.deserializer", "org.apache.kafka.common.serialization.StringDeserializer");
        props.put("value.deserializer", "org.apache.kafka.common.serialization.StringDeserializer");
        KafkaConsumer<String, String> consumer = new KafkaConsumer<>(props);
        logger.info("Starting Kafka Consumer...");
        consumer.subscribe(Arrays.asList(topic));
        logger.info("Kafka Consumer subscribed to topic: {}", topic);
        while (true) {
            ConsumerRecords<String, String> records = consumer.poll(100);
            for (ConsumerRecord<String, String> record : records)
                logger.info("Message received: {}", record.value());
        }
    }

}
Project Setup:
For Java Setup, please refer to: Java Setup
For Maven Setup, please refer to: Maven Setup
For Git and Project Setup, please refer to: Git and Project Setup
For Maven Setup, please refer to: Maven Setup
For Git and Project Setup, please refer to: Git and Project Setup
Run Application:
1. Start Zookeeper and Kafka ServerTo start Zookeeper use the command:
D:\Programs\Apache\kafka_2.11-0.11.0.0>bin\windows\zookeeper-server-start.bat config\zookeeper.properties
To start Kafka Server use the command:
D:\Programs\Apache\kafka_2.11-0.11.0.0>bin\windows\kafka-server-start.bat config/server.properties
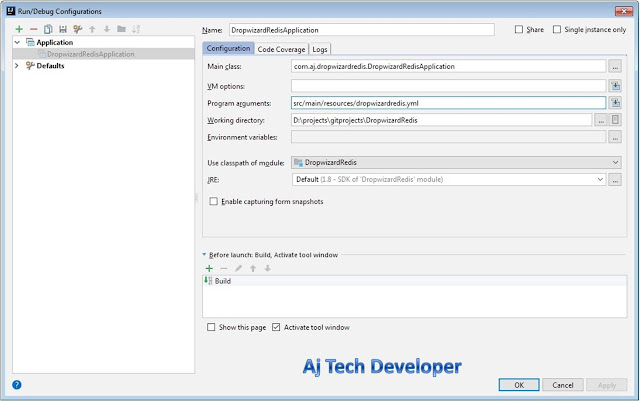
2. To run Spring Boot application in your IDE use:
Please Note: I am using application.yml to specify the server port as 4000.
Program argument: src\main\resources\application.yml

Alternatively, to run JAR from command prompt:
Build jar by using command:
mvn clean install
Run JAR by using the following command in Project folder location:
java -jar target\SpringBootKafkaProducer-1.0.0.jar src\main\resources\application.yml
3. I am using program argument to specify the Kafka Topic Name. I am using the Kafka Topic Name: softwaredevelopercentral.
Hence to run Java Kafka Consumer application in your IDE use:
Program argument: softwaredevelopercentral

Alternatively, to run JAR from command prompt:
Build jar by using command:
mvn clean install
Run JAR by using the following command in Project folder location:
java -jar target\KafkaConsumer-1.0.0.jar softwaredevelopercentral
API calls and results:
1. POST API to send message to Kafka Topic
Payload:
If you note, in the payload, I am mentioning the Kafka topic as softwaredevelopercentral
If you note, in the payload, I am mentioning the Kafka topic as softwaredevelopercentral
   {
     "topic": "softwaredevelopercentral",
     "message": "Hi Kafka!!! This is Aj Tech Developer on softwaredevelopercentral"
   }

After sending the payload, if you check the logs in the Kafka Consumer Application, you can see that it receives the message.

You can send multiple messages through the API using Postman and if you check the logs in the Kafka Consumer Application, you can see it receiving all the messages.
Other than this API, this application also has the following APIs:
1. GET API for Ping:
http://localhost:4000/ping
2. POST API for Ping:
http://localhost:4000/ping
You can check the GitHub code for the Spring Boot Application used in this post by going to the link: Spring Boot Kafka Producer
You can check the GitHub code for the Kafka Consumer Application used in this post by going to the link: Kafka Consumer.
Spring Boot and Dropwizard are the most popular and most used frameworks for building microservices. Just like Spring Boot, Dropwizard also can be integrated with Kafka in a few simple steps. To see how it is done, please check my post on Dropwizard Kafka integration by going to the link: Dropwizard Kafka Tutorial.
Learn the most popular and trending technologies like Machine Learning, Angular 5, Internet of Things (IoT), Akka HTTP, Play Framework, Dropwizard, Docker, Elastic Stack, Spring Boot and Flask in simple steps by reading my most popular blog posts at Software Developer Central.
If you like my post, please feel free to share it using the share button just below this paragraph or next to the heading of the post. You can also tweet with #SoftwareDeveloperCentral on Twitter. To get a notification on my latest posts or to keep the conversation going, you can follow me on Twitter. Please leave a note below if you have any questions or comments.
1. GET API for Ping:
http://localhost:4000/ping
2. POST API for Ping:
http://localhost:4000/ping
   {
    "input": "ping"
   }
Conclusion and GitHub link:
This tutorial gives an overview of Kafka and detailed steps to integrate Kafka with a Spring Boot Application.You can check the GitHub code for the Spring Boot Application used in this post by going to the link: Spring Boot Kafka Producer
You can check the GitHub code for the Kafka Consumer Application used in this post by going to the link: Kafka Consumer.
Spring Boot and Dropwizard are the most popular and most used frameworks for building microservices. Just like Spring Boot, Dropwizard also can be integrated with Kafka in a few simple steps. To see how it is done, please check my post on Dropwizard Kafka integration by going to the link: Dropwizard Kafka Tutorial.
Learn the most popular and trending technologies like Machine Learning, Angular 5, Internet of Things (IoT), Akka HTTP, Play Framework, Dropwizard, Docker, Elastic Stack, Spring Boot and Flask in simple steps by reading my most popular blog posts at Software Developer Central.
If you like my post, please feel free to share it using the share button just below this paragraph or next to the heading of the post. You can also tweet with #SoftwareDeveloperCentral on Twitter. To get a notification on my latest posts or to keep the conversation going, you can follow me on Twitter. Please leave a note below if you have any questions or comments.


Comments
Post a Comment