GraphQL, Spring Boot and MySQL Tutorial
GraphQL, Spring Boot and MySQL Tutorial
Introduction
When you search online for a GraphQL and Spring Boot tutorial, most of the times you end up with a tutorial which shows how to setup GraphQL freshly in a new application. Also most of the tutorials give a high level introduction and show operations on static hard-coded data. In this post I would like to show as to how you can add GraphQL functionalities to an existing Spring Boot REST API Application. In this application I am not using static data, instead I am retrieving data from MySQL database. So this tutorial gives a view of both RESTful APIs and GraphQL APIs.
GraphQL
GraphQL (Graph Query Language) is basically a query language for APIs and a runtime environment which helps us to query and get results for the data in our application. It is developed by Facebook. The advantages of using GraphQL are:
- A GraphQL query can be used to get the exact data required instead of fetching all the fields in an entity.
- GraphQL APIs get all the data the application requires in a single request. Hence Applications using GraphQL would be quick even on slow mobile network connections.
- GraphQL APIs uses a type system. They are organized as types and fields and not endpoints. All data can be accessed using a single endpoint.
- GraphQL engines are available in many languages. Since it is a query language for APIs, it can be used with any storage engine and existing data and code.
- It has support of powerful developer tools like GraphiQL which enables us to develop and test APIs faster.
To learn more about GraphQL, please refer to: GraphQL Website.
I am assuming that you have a Basic Knowledge of Spring Boot and have a Basic Spring Boot Application running in your machine. If not, please check my blog post on Basic Spring Boot Application by going to the link: Spring Boot Tutorial
I will be adding GraphQL functionalities to an existing Spring Boot MySQL Application. To understand this existing application, please check my blog post on Spring Boot MySQL Application by going to the link: Spring Boot MySQL Integration Tutorial
MySQL Database should be setup and running in your machine. To setup, run and test if the MySQL Database is working fine, please refer to my post on: MySQL Database Setup.
Requirements to Run the Application:
- Java
- Maven
- MySQL Database
- IDE of your choice
Once you have setup the Spring Boot MySQL Application, here are the additional steps required to add GraphQL functionalities to it.
Step 1: GraphQL related dependencies to be added to pom.xml
Here are the dependencies:
        <dependency>
            <groupId>com.graphql-java</groupId>
            <artifactId>graphql-spring-boot-starter</artifactId>
            <version>5.0.2</version>
        </dependency>
        <dependency>
            <groupId>com.graphql-java</groupId>
            <artifactId>graphql-java-tools</artifactId>
            <version>5.2.4</version>
        </dependency>
        <dependency>
            <groupId>com.graphql-java</groupId>
            <artifactId>graphiql-spring-boot-starter</artifactId>
            <version>5.0.2</version>
        </dependency>
Here is the full pom.xml:
<?xml version="1.0" encoding="UTF-8"?>
<project xmlns="http://maven.apache.org/POM/4.0.0" xmlns:xsi="http://www.w3.org/2001/XMLSchema-instance"
         xsi:schemaLocation="http://maven.apache.org/POM/4.0.0 http://maven.apache.org/xsd/maven-4.0.0.xsd">
    <modelVersion>4.0.0</modelVersion>
    <groupId>com.aj.springbootmysqlgraphql</groupId>
    <artifactId>SpringBootMySQLGraphQL</artifactId>
    <version>1.0.0</version>

    <parent>
        <groupId>org.springframework.boot</groupId>
        <artifactId>spring-boot-starter-parent</artifactId>
        <version>2.2.0.RELEASE</version>
    </parent>

    <properties>
        <jdk.version>1.8</jdk.version>
        <java.version>1.8</java.version>
        <packaging>jar</packaging>
    </properties>

    <dependencies>

        <dependency>
            <groupId>org.springframework.boot</groupId>
            <artifactId>spring-boot-starter-web</artifactId>
        </dependency>

        <dependency>
            <groupId>org.springframework.boot</groupId>
            <artifactId>spring-boot-starter-data-jpa</artifactId>
        </dependency>

        <dependency>
            <groupId>mysql</groupId>
            <artifactId>mysql-connector-java</artifactId>
        </dependency>

        <dependency>
            <groupId>com.zaxxer</groupId>
            <artifactId>HikariCP</artifactId>
            <version>2.6.3</version>
        </dependency>

        <dependency>
            <groupId>com.graphql-java</groupId>
            <artifactId>graphql-spring-boot-starter</artifactId>
            <version>5.0.2</version>
        </dependency>
        <dependency>
            <groupId>com.graphql-java</groupId>
            <artifactId>graphql-java-tools</artifactId>
            <version>5.2.4</version>
        </dependency>
        <dependency>
            <groupId>com.graphql-java</groupId>
            <artifactId>graphiql-spring-boot-starter</artifactId>
            <version>5.0.2</version>
        </dependency>

    </dependencies>

    <build>
        <plugins>
            <plugin>
                <artifactId>maven-compiler-plugin</artifactId>
                <version>3.0</version>
                <configuration>
                    <source>1.8</source>
                    <target>1.8</target>
                </configuration>
            </plugin>
            <plugin>
                <groupId>org.springframework.boot</groupId>
                <artifactId>spring-boot-maven-plugin</artifactId>
            </plugin>
        </plugins>
    </build>
</project>
Step 2: Create GraphQL Schema
GraphQL Schema has to be written in Schema Definition Language. The basic component of GraphQL is a type system. As mentioned earlier, the type system has types and fields.
By default, GraphQL has the types : Int, Float, String, Boolean and ID
The primary 2 types used in GraphQL related operations are:
- Query Type: This is equivalent to GET in REST. It is used to fetch data.
- Mutation Type: This is equivalent to POST, PUT and DELETE in REST. It is used to create, update and delete data.
The usage of these types should be defined with a GraphQL schema and this should be written in a file with the extension .graphqls. This file should then be created in the project folder location: src/main/resources
In our application, we will use Query and Mutation for different operations on Employee Object. Hence here is our file employee.graphqls:
type Employee {
  id: ID!
  name: String!
  department: String!
  salary: Int!
}

type Query {
  getEmployees: [Employee]!
  countEmployees: Float!
  getEmployee(id: ID):Employee
}

type Mutation {
    newEmployee (name: String!, department: String!, salary: Int!): Employee
    deleteEmployee(id: ID): Boolean!
}
Please Note: In the above file, ! indicates that the type/field is mandatory. If it is not used then it is optional.Step 3: Create the GraphQL classes
Query and Mutation Classes are the GraphQL classes and they need to be annotated with @Component for the Spring Boot system to understand and initialize them on start up.
Query class should implement GraphQLQueryResolver and all logic related to fetching data should be written in this class. Here is the class EmployeeQuery.java:
Query class should implement GraphQLQueryResolver and all logic related to fetching data should be written in this class. Here is the class EmployeeQuery.java:
package com.aj.springbootmysqlgraphql.graphql;

import com.aj.springbootmysqlgraphql.domain.Employee;
import com.aj.springbootmysqlgraphql.service.EmployeeService;
import com.coxautodev.graphql.tools.GraphQLQueryResolver;
import org.springframework.beans.factory.annotation.Autowired;
import org.springframework.stereotype.Component;

import java.util.List;
import java.util.Optional;

@Component
public class EmployeeQuery implements GraphQLQueryResolver {

    @Autowired
    private EmployeeService employeeservice;

    public List<Employee> getEmployees() {
        return employeeservice.findAll();
    }

    public long countEmployees() {
        return employeeservice.count();
    }

    public Optional<Employee> getEmployee(final int id) {
        return employeeservice.findById(id);
    }
}
Mutation class should implement GraphQLMutationResolver and all logic related to creating, updating and deleting data should be written in this class. Here is the class EmployeeMutation.java:
package com.aj.springbootmysqlgraphql.graphql;

import com.aj.springbootmysqlgraphql.domain.Employee;
import com.aj.springbootmysqlgraphql.service.EmployeeService;
import com.coxautodev.graphql.tools.GraphQLMutationResolver;
import org.springframework.beans.factory.annotation.Autowired;
import org.springframework.stereotype.Component;

@Component
public class EmployeeMutation implements GraphQLMutationResolver {

    @Autowired
    private EmployeeService employeeService;

    public Employee newEmployee (String name, String department, Integer salary) {
        Employee employee = new Employee ();
        employee.setName(name);
        employee.setDepartment(department);
        employee.setSalary(salary);
        employeeService.save(employee);
        Employee newEmployee = employeeService.findByNameDepartmentSalary(name, department, salary);
        return newEmployee;
    }

    public boolean deleteEmployee (Integer id) {
        return employeeService.deleteById(id);
    }
}
Project Setup:
For Java Setup, please refer to: Java Setup
For Maven Setup, please refer to: Maven Setup
For Git and Project Setup, please refer to: Git and Project Setup
For Maven Setup, please refer to: Maven Setup
For Git and Project Setup, please refer to: Git and Project Setup
Run Application:
1. Start the MySQL Database by going to the bin directory on the MySQL folder in command prompt and executing the command given below.
For me it is: D:\Programs\mysql-5.7.19-winx64\bin and the command is:
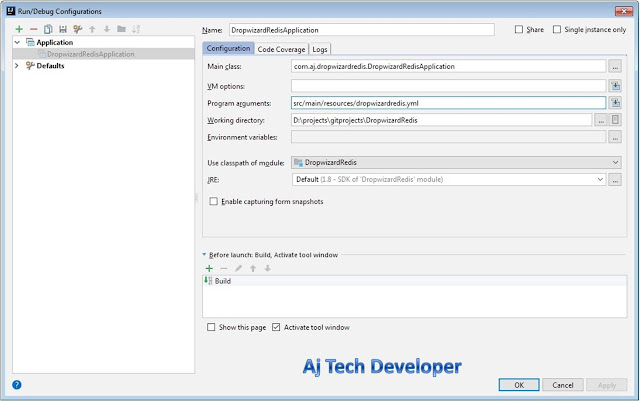
2. To run application in your IDE use:
Program arguments: src\main\resources\application.yml
3. To run JAR from command prompt:
Build jar by using command:
For me it is: D:\Programs\mysql-5.7.19-winx64\bin and the command is:
mysqld --console
You can see the start-up logs being printed.
2. To run application in your IDE use:
Program arguments: src\main\resources\application.yml
3. To run JAR from command prompt:
Build jar by using command:
mvn clean installRun JAR by using command in Project folder location:
java -jar target\SpringBootMySQLGraphQL-1.0.0.jar src\main\resources\application.yml
API calls and Results:
Here is the data in MySQL DB, Table: employee
GraphiQL is a developer tool to test the GraphQL APIs and we have added the library related to this in our pom.xml. Hence after the application starts up, this will be available to use for testing. To bring GraphiQL up, use the URL:
GraphiQL is a developer tool to test the GraphQL APIs and we have added the library related to this in our pom.xml. Hence after the application starts up, this will be available to use for testing. To bring GraphiQL up, use the URL:
Query:
1. Get all Employees
This can be called using a POST API. Here is the call using Postman.
{
  getEmployees {
    name
    department
    salary
  }
}
This can be called using a POST API. Here is the call using Postman.
POST API to get employees:
http://localhost:4000/graphql
JSON Request Body:http://localhost:4000/graphql
 {
 "query": "{getEmployees {name department salary}}"
 }
2. Count number of Employees{
countEmployees
}
POST API to count employees:
http://localhost:4000/graphql
JSON Request Body:http://localhost:4000/graphql
 {
 "query": "{countEmployees}"
 }
3. Get Employee By ID {
getEmployee (id: 5) {
id
name
department
salary
}
}
POST API to Get Employee by ID:
http://localhost:4000/graphql
JSON Request Body:http://localhost:4000/graphql
 {
 "query": "{getEmployee (id: 5) {id name department salary}}"
 }
Mutation
1. Create a new Employeemutation {
newEmployee (name: "Jane",department: "Technology", salary: 30000)
{
id
name
department
salary
}
}
POST API to create a new Employee:
http://localhost:4000/graphql
JSON Request Body:http://localhost:4000/graphql
 {
 "query": "mutation {newEmployee (name: \"Mary\",department: \"HR\",salary: 20000) {id name department salary}}"
 }
2. Delete Employee By ID mutation {
deleteEmployee(id: 10)
}
POST API to delete an Employee by ID:
http://localhost:4000/graphql
JSON Request Body:http://localhost:4000/graphql
 {
 "query": "mutation {deleteEmployee(id: 5)}"
 }
Conclusion and GitHub link:
In this post I have shown you as to how you can configure and use GraphQL in your existing Spring Boot Application along with a relational database. The code used in this post is available on GitHub.
Learn the most popular and trending technologies like Blockchain, Cryptocurrency, Machine Learning, Chatbots, Internet of Things (IoT), Big Data Processing, Elastic Stack, React, Progressive Web Application (PWA), Angular 5, GraphQL, Akka HTTP, Play Framework, Dropwizard, Docker, Netflix Eureka, Netflix Zuul, Spring Cloud, Spring Boot, Flask and RESTful Web Service integration with MongoDB, Kafka, Redis, Aerospike, MySQL DB in simple steps by reading my most popular blog posts at Software Developer Central.
If you like my post, please feel free to share it using the share button just below this paragraph or next to the heading of the post. You can also tweet with #SoftwareDeveloperCentral on Twitter. To get a notification on my latest posts or to keep the conversation going, you can follow me on Twitter or Instagram. Please leave a note below if you have any questions or comments.
If you like my post, please feel free to share it using the share button just below this paragraph or next to the heading of the post. You can also tweet with #SoftwareDeveloperCentral on Twitter. To get a notification on my latest posts or to keep the conversation going, you can follow me on Twitter or Instagram. Please leave a note below if you have any questions or comments.


Comments
Post a Comment