Dropwizard Sundial Scheduler Tutorial
Dropwizard Sundial Scheduler Tutorial
Introduction
The functionality of scheduling jobs is frequently used in many applications today. Sundial is a quartz fork. dropwizard-sundial library makes it very easy to configure and integrate a job scheduler into a Dropwizard application. This blog post will give you a comprehensive overview of this functionality.
Sundial is a Lightweight Job Scheduling Framework for Java. Sundial makes adding scheduled jobs to your Java application very simple. All we have to do is define jobs, define triggers, and start the Sundial scheduler. For more details about it please refer to: Sundial GitHub page.
Sundial is a Lightweight Job Scheduling Framework for Java. Sundial makes adding scheduled jobs to your Java application very simple. All we have to do is define jobs, define triggers, and start the Sundial scheduler. For more details about it please refer to: Sundial GitHub page.
Dropwizard is one of the most popular and most used frameworks for building microservices.
I am assuming that you have a Basic Knowledge of Dropwizard and have a Basic Dropwizard Application running in your machine. If not, please check my blog post on Basic Dropwizard Application by going to the link: Dropwizard Tutorial.
Requirements to Run the Application:
Requirements to Run the Application:
- Java
- Maven
- IDE of your choice
Once you have a Basic Dropwizard Application up and running in your machine, here are the additional steps required to add the job scheduling functionality.
Step 1: Maven Dependencies to be added in pom.xml
Add dropwizard-sundial library to the project by using the following dependency in the pom.xml:
<dependency>
  <groupId>org.knowm</groupId>
  <artifactId>dropwizard-sundial</artifactId>
  <version>1.3.1</version>
</dependency>
Here is the full pom.xml:
<?xml version="1.0" encoding="UTF-8"?>
<project xmlns="http://maven.apache.org/POM/4.0.0" xmlns:xsi="http://www.w3.org/2001/XMLSchema-instance" xsi:schemaLocation="http://maven.apache.org/POM/4.0.0 http://maven.apache.org/xsd/maven-4.0.0.xsd">
 <modelVersion>4.0.0</modelVersion>
 <groupId>com.aj.dropwizardsundial</groupId>
 <artifactId>DropwizardSundial</artifactId>
 <version>1.0.0</version>


 <properties>
  <dropwizard.version>1.3.9</dropwizard.version>
        <jdk.version>1.8</jdk.version>
  <packaging>jar</packaging>
 </properties>

 <dependencies>

  <dependency>
            <groupId>io.dropwizard</groupId>
            <artifactId>dropwizard-core</artifactId>
            <version>${dropwizard.version}</version>
        </dependency>

  <dependency>
   <groupId>org.knowm</groupId>
   <artifactId>dropwizard-sundial</artifactId>
   <version>1.3.1</version>
  </dependency>

 </dependencies>

 <build>
  <plugins>
   <plugin>
    <artifactId>maven-compiler-plugin</artifactId>
    <version>3.0</version>
    <configuration>
     <source>1.8</source>
     <target>1.8</target>
    </configuration>
   </plugin>
   <plugin>
    <groupId>org.apache.maven.plugins</groupId>
    <artifactId>maven-jar-plugin</artifactId>
    <version>3.1.1</version>
   </plugin>
   <plugin>
    <groupId>org.apache.maven.plugins</groupId>
    <artifactId>maven-shade-plugin</artifactId>
    <version>3.2.1</version>
    <configuration>
     <createDependencyReducedPom>true</createDependencyReducedPom>
     <filters>
      <filter>
       <artifact>*:*</artifact>
       <excludes>
        <exclude>META-INF/*.SF</exclude>
        <exclude>META-INF/*.DSA</exclude>
        <exclude>META-INF/*.RSA</exclude>
       </excludes>
      </filter>
     </filters>
    </configuration>
    <executions>
     <execution>
      <phase>package</phase>
      <goals>
       <goal>shade</goal>
      </goals>
      <configuration>
       <transformers>
        <transformer implementation="org.apache.maven.plugins.shade.resource.ServicesResourceTransformer" />
        <transformer implementation="org.apache.maven.plugins.shade.resource.ManifestResourceTransformer">
         <mainClass>com.aj.dropwizardsundial.DropwizardSundialApplication</mainClass>
        </transformer>
       </transformers>
      </configuration>
     </execution>
    </executions>
   </plugin>
  </plugins>
 </build>
</project>
Step 2: Configuration in yml file and in the Configuration class
In the yml file I am setting the Sundial related parameters. I am also setting the Application Name as DropwizardRedis, Application server port as 4000 and adminContextPath as: /admin
Here is the full yml file dropwizardsundial.yml:
logging:
  level: INFO

  appenders:
    - type: console
      threshold: ALL
      timeZone: IST

server:
  type: simple
  applicationContextPath: /
  adminContextPath: /admin
  connector:
      port: 4000
      type: http

appName : DropwizardSundial

sundial:
  thread-pool-size: 10
  shutdown-on-unload: true
  start-delay-seconds: 0
  start-scheduler-on-load: true
  global-lock-on-load: false
  annotated-jobs-package-name: com.aj.dropwizardsundial.job
  tasks: [startjob, stopjob]
Getters and setters for the properties in the yml file are created in the Configuration class.
Here is the file: DropwizardSundialConfiguration.java:package com.aj.dropwizardsundial;
import com.fasterxml.jackson.annotation.JsonProperty;
import io.dropwizard.Configuration;
import com.fasterxml.jackson.annotation.JsonIgnoreProperties;
import org.knowm.dropwizard.sundial.SundialConfiguration;
import javax.validation.Valid;
import javax.validation.constraints.NotNull;
@JsonIgnoreProperties(ignoreUnknown = true)
public class DropwizardSundialConfiguration extends Configuration {
@JsonProperty
public String appName;
public String getAppName() {
return appName;
}
public void setAppName(String appName) {
this.appName = appName;
}
@Valid
@NotNull
public SundialConfiguration sundialConfiguration = new SundialConfiguration();
@JsonProperty("sundial")
public SundialConfiguration getSundialConfiguration() {
return sundialConfiguration;
}
}
Step 3: Add the Sundial Bundle in the Application Class
Everything comes together in the application class. We register the resources, health check and most importantly add and configure the dropwizard-sundial bundle.
Here is the file: DropwizardSundialApplication.java:
package com.aj.dropwizardsundial;

import com.aj.dropwizardsundial.resource.DropwizardSundialHealthCheckResource;
import com.aj.dropwizardsundial.resource.PingResource;
import io.dropwizard.Application;
import io.dropwizard.setup.Bootstrap;
import io.dropwizard.setup.Environment;
import org.knowm.dropwizard.sundial.SundialBundle;
import org.knowm.dropwizard.sundial.SundialConfiguration;
import org.slf4j.Logger;
import org.slf4j.LoggerFactory;


public class DropwizardSundialApplication extends Application<DropwizardSundialConfiguration> {

    private static final Logger logger = LoggerFactory.getLogger(DropwizardSundialApplication.class);

 public static void main(String[] args) throws Exception {
  new DropwizardSundialApplication().run("server", args[0]);
 }

    @Override
    public void initialize(Bootstrap<DropwizardSundialConfiguration> b) {
  b.addBundle(new SundialBundle<DropwizardSundialConfiguration>() {

   @Override
   public SundialConfiguration getSundialConfiguration(DropwizardSundialConfiguration configuration) {
    return configuration.getSundialConfiguration();
   }
  });
 }

 @Override
 public void run(DropwizardSundialConfiguration config, Environment env)
   throws Exception {
        logger.info("Registering RESTful API resources");
  env.jersey().register(new PingResource());
  env.healthChecks().register("DropwizardSundialHealthCheck",
    new DropwizardSundialHealthCheckResource(config));
 }
}
Step 4: Create the required Job Classes
I am creating 2 Job Classes. One is a Job Class with a Simple Trigger and the other is a Job Class with a Cron Trigger. The code is very simple and self explanatory. All you have to do is to write the logic of the scheduled task in your application in the overridden doRun() method.
Here is SimpleJob.java:
package com.aj.dropwizardsundial.job;

import org.knowm.sundial.Job;
import org.knowm.sundial.annotations.SimpleTrigger;
import org.knowm.sundial.exceptions.JobInterruptException;
import org.slf4j.Logger;
import org.slf4j.LoggerFactory;

import java.util.concurrent.TimeUnit;

@SimpleTrigger(repeatInterval = 10, timeUnit = TimeUnit.SECONDS)
public class SimpleJob extends Job {

    private static final Logger logger = LoggerFactory.getLogger(SimpleJob.class);
    @Override
    public void doRun() throws JobInterruptException {
        logger.info("Hello from Sample Job");
    }
}
Here is CronJob.java:
package com.aj.dropwizardsundial.job;

import org.knowm.sundial.Job;
import org.knowm.sundial.annotations.CronTrigger;
import org.knowm.sundial.exceptions.JobInterruptException;
import org.slf4j.Logger;
import org.slf4j.LoggerFactory;

@CronTrigger(cron = "0 19 13 * * ?")
public class CronJob extends Job {

    private static final Logger logger = LoggerFactory.getLogger(CronJob.class);
    @Override
    public void doRun() throws JobInterruptException {
        logger.info("Hello from Cron Job");
    }
}
Concurrent Job Execution
By default jobs are not set to concurrently execute. This means if a job is currently running and a trigger is fired for that job, it will skip running the job. In some cases concurrent job execution is desired and to configure it use the Sundial annotation as below:
@SimpleTrigger(repeatInterval = 10, timeUnit = TimeUnit.SECONDS, isConcurrencyAllowed = true)The same can be used for Cron annotation as well.
Few examples of Cron Expressions
0 0 13 * * ? - Fire at 1 PM (noon) every day
0 20 11 * * ? - Fire at 11:20 AM every day
0 20 11 ? * MON-FRI - Fire at 11:20 AM every Monday, Tuesday, Wednesday, Thursday and Friday
0 0/10 * * * ? - Fire every 10 minutes starting at 12 AM (midnight) every day
Project Setup:
For Java Setup, please refer to: Java Setup
For Maven Setup, please refer to: Maven Setup
For Git and Project Setup, please refer to: Git and Project Setup
For Maven Setup, please refer to: Maven Setup
For Git and Project Setup, please refer to: Git and Project Setup
Run Application:
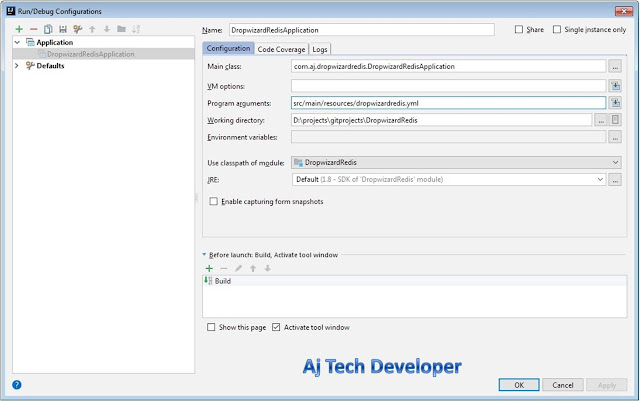
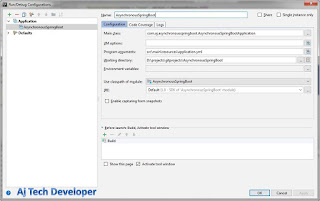
1. To run application in your IDE use:
Program arguments: src/main/resources/dropwizardsundial.yml


Program arguments: src/main/resources/dropwizardsundial.yml

2. To run JAR from command prompt:
Build jar by using command:
Build jar by using command:
mvn clean installRun JAR by using command in Project folder location:
java -jar target\DropwizardSundial-1.0.0.jar src\main\resources\dropwizardsundial.yml
Results:
Simple Job prints log statement every 10 seconds and the Cron Job prints log statement at the time given in the Cron Expression as shown in the image below:


Other API calls and results:
Other than these APIs, this application has the following APIs:
1. GET API for Application Health Check:
2. GET API to Ping and test if the application is up and running:
3. POST API to Ping and test if the application is up and running:
JSON Request Body:
    {
     "input": "ping"
    }
4. GET Admin API to see application metrics: Dropwizard provides this Admin API. As I have set adminContextPath as: /admin in dropwizardmongodb.yml the link I need to use in any browser is: http://localhost:4000/admin/
You can click on individual links on this page to see different application metrics.

Conclusion and GitHub link:
In this post I have shown you as to how you can implement the scheduler functionality in a Dropwizard application. The code used in this post is available on GitHub.
Learn the most popular and trending technologies like Machine Learning, Chatbots, Internet of Things (IoT), Big Data Processing, Elastic Stack, Angular 5, Akka HTTP, Play Framework, Dropwizard, Docker, Netflix Eureka, Netflix Zuul, Spring Cloud, Spring Boot, Flask and RESTful Web Service integration with MongoDB, Kafka, Redis, Aerospike, MySQL DB in simple steps by reading my most popular blog posts at Software Developer Central.
If you like my post, please feel free to share it using the share button just below this paragraph or next to the heading of the post. You can also tweet with #SoftwareDeveloperCentral on Twitter. To get a notification on my latest posts or to keep the conversation going, you can follow me on Twitter or Instagram. Please leave a note below if you have any questions or comments.
Comments
Post a Comment