Spring Boot MySQL Integration Tutorial
Spring Boot MySQL Integration Tutorial
Introduction
I was searching online for a complete tutorial on Spring Boot integration with MySQL database with all the CRUD operations and I was surprised that I could not find even one. The ones I found had just create and read operations or only view operation. Even the example on the official Spring website: Accessing data with MySQL, has only create and view database operations. Hence I have come up with this post to give you a comprehensive overview of all the CRUD operations. I have also integrated HikariCP to the Spring Boot application. This will give you an optimized connection pooling. Please feel free to use my application as a base to build your own application.
I am assuming that you have a Basic Knowledge of Spring Boot and have a Basic Spring Boot Application running in your machine. If not, please check my blog on Basic Spring Boot Application by going to the link: Spring Boot Tutorial
In this post, I am using a simple Employee Table to perform CRUD operations. Here is the script to create this table in the MySQL Database:
I am assuming that you have a Basic Knowledge of Spring Boot and have a Basic Spring Boot Application running in your machine. If not, please check my blog on Basic Spring Boot Application by going to the link: Spring Boot Tutorial
In this tutorial, we will be integrating a Spring Boot Application with MySQL Database, which is a relational database, to perform CRUD operations. The same steps can be followed to connect to any other relational database.
Requirements to Run the Application:
Requirements to Run the Application:
- Java
- Maven
- MySQL Database
- IDE of your choice
MySQL Database should be setup and running in your machine. To setup, run and test if the MySQL Database is working fine, please refer to my post on: MySQL Database Setup.
CREATE TABLE EMPLOYEE (
ID INT NOT NULL AUTO_INCREMENT PRIMARY KEY,
NAME VARCHAR(50),
DEPARTMENT VARCHAR(50),
SALARY INT(20)
);
Once you have a Basic Spring Boot Application, here are the additional steps required to integrate it with MySQL Database.
Step 1: Spring Boot Data JPA, MySQL Java Connector and HikariCP Maven dependencies to be added to pom.xml
Here are the dependencies: <dependency>
<groupId>org.springframework.boot</groupId>
<artifactId>spring-boot-starter-data-jpa</artifactId>
</dependency>
<dependency>
<groupId>mysql</groupId>
<artifactId>mysql-connector-java</artifactId>
</dependency>
<dependency>
<groupId>com.zaxxer</groupId>
<artifactId>HikariCP</artifactId>
<version>2.6.3</version>
</dependency>
Here is the full pom.xml:<?xml version="1.0" encoding="UTF-8"?>
<project xmlns="http://maven.apache.org/POM/4.0.0" xmlns:xsi="http://www.w3.org/2001/XMLSchema-instance"
xsi:schemaLocation="http://maven.apache.org/POM/4.0.0 http://maven.apache.org/xsd/maven-4.0.0.xsd">
<modelVersion>4.0.0</modelVersion>
<groupId>com.aj.springbootmysql</groupId>
<artifactId>SpringBootMySQL</artifactId>
<version>1.0.0</version>
<parent>
<groupId>org.springframework.boot</groupId>
<artifactId>spring-boot-starter-parent</artifactId>
<version>2.3.3.RELEASE</version>
</parent>
<properties>
<jdk.version>1.8</jdk.version>
<java.version>1.8</java.version>
<packaging>jar</packaging>
</properties>
<dependencies>
<dependency>
<groupId>org.springframework.boot</groupId>
<artifactId>spring-boot-starter-web</artifactId>
</dependency>
        <dependency>
            <groupId>org.springframework.boot</groupId>
            <artifactId>spring-boot-starter-data-jpa</artifactId>
        </dependency>

        <dependency>
            <groupId>mysql</groupId>
            <artifactId>mysql-connector-java</artifactId>
        </dependency>

        <dependency>
            <groupId>com.zaxxer</groupId>
            <artifactId>HikariCP</artifactId>
            <version>2.6.3</version>
        </dependency>
</dependencies>
<build>
<plugins>
<plugin>
<artifactId>maven-compiler-plugin</artifactId>
<version>3.0</version>
<configuration>
<source>1.8</source>
<target>1.8</target>
</configuration>
</plugin>
<plugin>
<groupId>org.springframework.boot</groupId>
<artifactId>spring-boot-maven-plugin</artifactId>
</plugin>
</plugins>
</build>
</project>Step 2: Setup Database configuration in the yml file
Database and HikariCP configurations are added to the yml file. I have named my database as: softwaredevelopercentral. Here is the yml file(application.yml):
server:
    port: 4000

spring:
    jpa:
        database: MYSQL
        hibernate:
            ddl-auto: none

    datasource:
        type: com.zaxxer.hikari.HikariDataSource
        url: jdbc:mysql://localhost:3306/softwaredevelopercentral?autoReconnect=true&useSSL=false
        username: root
        password:
        hikari:
            connection-timeout: 60000
            maximum-pool-size: 5
- none This is the default for MySQL, no change to the database structure.
- update Hibernate changes the database according to the given Entity structures.
- create Creates the database every time, but don’t drop it when close.
- create-drop Creates the database then drops it when the SessionFactory closes.
I have used none, as I am creating the database table Employee upfront and do not want my application changing the database structure.
To use HikariCP for connection pooling, I have set spring.datasource.type as com.zaxxer.hikari.HikariDataSource and mentioned the hikari properties under: spring.datasource.hikari
Step 3: Create the Entity class
In this post, I am using a simple entity Employee with attributes: ID, NAME, DEPARTMENT and SALARY. Here is the Entity Model, Employee.java:
package com.aj.springbootmysql.domain;

import javax.persistence.Entity;
import javax.persistence.GeneratedValue;
import javax.persistence.GenerationType;
import javax.persistence.Id;

@Entity
public class Employee {

    @Id
    @GeneratedValue(strategy= GenerationType.IDENTITY)
    private Integer id;
    private String name;
    private String department;
    private Integer salary;

    public Integer getId() {
        return id;
    }

    public void setId(Integer id) {
        this.id = id;
    }

    public String getName() {
        return name;
    }

    public void setName(String name) {
        this.name = name;
    }

    public String getDepartment() {
        return department;
    }

    public void setDepartment(String department) {
        this.department = department;
    }

    public Integer getSalary() {
        return salary;
    }

    public void setSalary(Integer salary) {
        this.salary = salary;
    }

    @Override
    public String toString() {
        return "Employee{" +
                "id=" + id +
                ", name='" + name + '\'' +
                ", department='" + department + '\'' +
                ", salary=" + salary +
                '}';
    }
}
Step 4: Create Repository
Repository interface is created for all database operations. I am extending my repository from the CrudRepository which mainly provides CRUD functions. Here is the repository, EmployeeRepository.java:
package com.aj.springbootmysql.repository;

import com.aj.springbootmysql.domain.Employee;
import org.springframework.data.jpa.repository.Modifying;
import org.springframework.data.jpa.repository.Query;
import org.springframework.data.repository.CrudRepository;
import org.springframework.data.repository.query.Param;
import org.springframework.stereotype.Repository;

import java.util.List;

@Repository
public interface EmployeeRepository extends CrudRepository<Employee, Integer> {

    List<Employee> findByName(String name);

    @Modifying(clearAutomatically = true)
    @Query("Update Employee emp set emp.name =:name, emp.department =:department,emp.salary =:salary where emp.id =:id")
    int updateEmployee(@Param("name") String name, @Param("department") String department,
                         @Param("salary") Integer salary, @Param("id") Integer id);
}
Step 5: Create the Service Layer
We will create a service layer, that acts as a mediator between the Controller and Repository layers. Here is the code for EmployeeServiceImpl.java:package com.aj.springbootmysql.service.impl;
import com.aj.springbootmysql.domain.Employee;
import com.aj.springbootmysql.repository.EmployeeRepository;
import com.aj.springbootmysql.service.EmployeeService;
import org.slf4j.Logger;
import org.slf4j.LoggerFactory;
import org.springframework.beans.factory.annotation.Autowired;
import org.springframework.stereotype.Service;
import org.springframework.transaction.annotation.Transactional;
import java.util.List;
@Service
public class EmployeeServiceImpl implements EmployeeService {
private static final Logger logger = LoggerFactory.getLogger(EmployeeServiceImpl.class);
@Autowired
private EmployeeRepository employeeRepository;
public void save(Employee employeeRequest) {
logger.info("Entering EmployeeServiceImpl.save Method with Employee Details: {}", employeeRequest.toString());
Employee employee = new Employee();
employee.setName(employeeRequest.getName());
employee.setDepartment(employeeRequest.getDepartment());
employee.setSalary(employeeRequest.getSalary());
employeeRepository.save(employee);
logger.info("Leaving EmployeeServiceImpl.save Method");
}
public Iterable<Employee> findAll() {
return employeeRepository.findAll();
}
public List<Employee> findByName(String name) {
return employeeRepository.findByName(name);
}
@Transactional
public int updateEmployee(Employee employeeRequest) {
logger.info("Entering EmployeeServiceImpl.updateEmployee Method with Employee Details: {}", employeeRequest.toString());
return employeeRepository.updateEmployee(employeeRequest.getName(), employeeRequest.getDepartment(),
employeeRequest.getSalary(), employeeRequest.getId());
}
public void delete(Integer id) {
employeeRepository.deleteById(id);
}
}
Step 6: Create Controller Class with RESTful APIs for CRUD operations on the Database
The EmployeeController class has the following APIs:
- GET API to get all employees
- GET API to get employee by NAME
- POST API to create an employee
- PUT API to update an employee
- DELETE API to delete an employee by ID
Here is the code for EmployeeController.java:
For me it is: D:\Programs\mysql-5.7.19-winx64\bin and the command is:
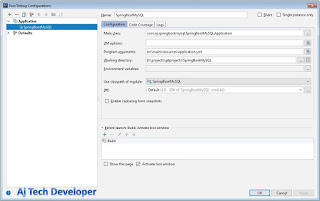
2. To run application in your IDE use:
Program arguments: src\main\resources\application.yml
3. To run JAR from command prompt:
Build jar by using command:
Learn the most popular and trending technologies like Machine Learning, Angular 5, Internet of Things (IoT), Akka HTTP, Play Framework, Dropwizard, Docker, Elastic Stack, Spring Boot and Flask in simple steps by reading my most popular blog posts at Software Developer Central.
package com.aj.springbootmysql.controller;

import com.aj.springbootmysql.domain.Employee;
import com.aj.springbootmysql.service.EmployeeService;
import org.slf4j.Logger;
import org.slf4j.LoggerFactory;
import org.springframework.beans.factory.annotation.Autowired;
import org.springframework.http.HttpStatus;
import org.springframework.http.ResponseEntity;
import org.springframework.web.bind.annotation.*;

import java.util.HashMap;
import java.util.List;
import java.util.Map;


@RestController
@RequestMapping("/employee")
public class EmployeeController {

    private static final Logger logger = LoggerFactory.getLogger(EmployeeController.class);

    @Autowired
    private EmployeeService employeeService;

    @GetMapping
	public ResponseEntity<Iterable<Employee>> getAllEmployees() {
        logger.info("In EmployeeController.getAllEmployees");
        Iterable<Employee> employees = employeeService.findAll();
        return new ResponseEntity<>(employees, HttpStatus.OK);
	}

    @GetMapping("/{name}")
    public ResponseEntity<Iterable<Employee>> findByName(@PathVariable String name) {
        logger.info("Name in EmployeeController.findByName is: {}", name);
        List<Employee> employees = employeeService.findByName(name);
        return new ResponseEntity<>(employees, HttpStatus.OK);
    }

    @PostMapping
    public ResponseEntity<Map<String, String>> addEmployee(@RequestBody Employee employeeRequest) {
        logger.info("Request received in EmployeeController.addEmployee is: {}", employeeRequest.toString());
        Map<String, String> response = new HashMap<>();
        employeeService.save(employeeRequest);
        response.put("message", "Employee saved successfully");
        return new ResponseEntity<>(response, HttpStatus.OK);
    }

    @PutMapping
    public ResponseEntity<Map<String, String>> updateEmployee(@RequestBody Employee employeeRequest) {
        logger.info("Request received in EmployeeController.updateEmployee is: {}", employeeRequest.toString());
        Map<String, String> response = new HashMap<>();
        int rowsUpdated = employeeService.updateEmployee(employeeRequest);
        if(rowsUpdated > 0) {
            response.put("message", "Employee updated successfully");
        }
        else{
            response.put("message", "Employee not updated");
        }
        return new ResponseEntity<>(response, HttpStatus.OK);
    }

    @DeleteMapping("/{id}")
    public ResponseEntity<Map<String, String>> deleteEmployee(@PathVariable Integer id) {
        logger.info("ID in EmployeeController.deleteEmployee is: {}", id.toString());
        Map<String, String> response = new HashMap<>();
        employeeService.delete(id);
        response.put("message", "Employee deleted successfully");
        return new ResponseEntity<>(response, HttpStatus.OK);
    }
}
Project Setup:
For Java Setup, please refer to: Java Setup
For Maven Setup, please refer to: Maven Setup
For Git and Project Setup, please refer to: Git and Project Setup
For Maven Setup, please refer to: Maven Setup
For Git and Project Setup, please refer to: Git and Project Setup
Run Application:
1. Start the MySQL Database by going to the bin directory on the MySQL folder in command prompt and executing the command given below.For me it is: D:\Programs\mysql-5.7.19-winx64\bin and the command is:
mysqld --console
You can see the start-up logs being printed.
2. To run application in your IDE use:
Program arguments: src\main\resources\application.yml

3. To run JAR from command prompt:
Build jar by using command:
mvn clean installRun JAR by using command in Project folder location:
java -jar target/SpringBootMySQL-1.0.0.jar src/main/resources/application.yml
API calls and results:
1. GET API to get all employees:
2. POST API to create an employee
JSON Request Body: {
"name": "Jim",
"department": "Accounts",
"salary": 10000
}
JSON Request Body: {
"id":1,
"name": "Jim",
"department": "Accounts",
"salary": 12000
}
5. DELETE API to delete an employee by ID
Other than these APIs, this application has the following APIs:
1. GET API to Ping and test if the application is up and running:
2. POST API to Ping and test if the application is up and running:
JSON Request Body:
    {
     "input": "ping"
    }
Conclusion and GitHub link:
In this post I have shown you how you can integrate your existing Spring Boot Application with MySQL Database and perform CRUD operations using RESTful APIs. The code used in this post is available on GitHub.
Dropwizard and Spring Boot are the most popular and most used frameworks for building microservices. Just like Spring Boot, Dropwizard also can be integrated with MySQL DB in a few simple steps. To see how it is done, please check my post on Dropwizard MySQL integration by going to the link: Dropwizard MySQL Integration Tutorial.Learn the most popular and trending technologies like Machine Learning, Angular 5, Internet of Things (IoT), Akka HTTP, Play Framework, Dropwizard, Docker, Elastic Stack, Spring Boot and Flask in simple steps by reading my most popular blog posts at Software Developer Central.
If you like my post, please feel free to share it using the share button just below this paragraph or next to the heading of the post. You can also tweet with #SoftwareDeveloperCentral on Twitter. To get a notification on my latest posts or to keep the conversation going, you can follow me on Twitter. Please leave a note below if you have any questions or comments.


Comments
Post a Comment